Line Settings
Use the Fax Line pull-down menu to select a fax line. Configure each line whether or not it is in use.
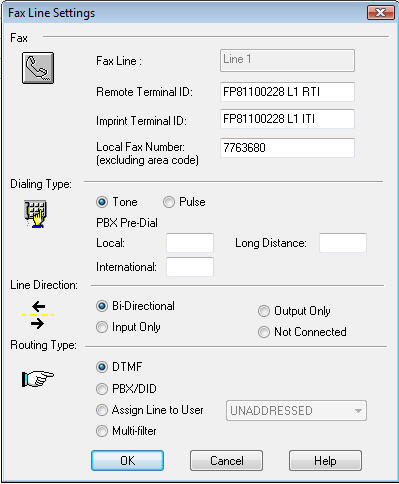
Use the Remote Terminal ID field to provide the line with an identifier by entering a name or number. The Premier uses this information to identify itself to the receiving fax machine during the negotiation phase of the fax transmission. Enter up to 20 characters for this feature.
Use the Imprint Terminal ID field to have your company name or other identifier appear in the header at the top of each successful fax transmission. Enter up to 20 characters.
When enabled and customized, the Enable Customized Imprint feature uses the Remote Terminal ID and Imprint Terminal ID settings displayed here. See Using the Imprint Header.
Use the Local Fax Phone Number field to enter the fax number of the line connected to this line port.
Select the radio button that describes the dialing type the phone line supports. Lines configured for Pulse dialing support phones with rotary dials. Lines configured for Tone dialing support push button and newer dialing systems. Refer to your phone company representative if for help determining the dialing type your phone lines support.
Use the PBX Pre-dial’s Local, Long Distance and International fields to enter the prefix your PBX system requires for accessing an outside phone line. Up to five digits are allowed. This is not required if the FaxPress is not connected to a PBX system. FaxPress automatically inserts a 3 second pause after the PBX pre-dial. This means that you do not have to insert a comma after the PBX digits.
| ■ | Bi-Directional if you want the line to handle incoming and outgoing faxes. |
| ■ | Input Only if you want the line to handle incoming faxes only. |
| ■ | Output Only if you want the line to handle outgoing faxes only. |
| ■ | Not Connected if you don’t want the line to handle incoming or outgoing faxes. Lines not connected must be configured as Not Connected. |
If there is no phone line connected to the fax port and Not Connected is not selected, FaxPress will send fax jobs through the fax port and cause failed job status for each attempted outgoing fax.
The line direction parameter must be set for each line on the FaxPress Premier server. If a line is not currently being used, set this parameter to Not Connected.
Allows you to set the method the Premier will use to distribute faxes received on the current line to user mailboxes.
Select the DTMF PBX/ DID or Assigned Line User. DID and DTMF are automatic routing systems that deliver incoming faxes directly to the recipient’s Premier mailbox. See Automatic Routing and PBX Integration for information on configuring the Premier for DID/PBX integration.
If automatic routing is not used for the current fax line, leave the default Assigned Line To User selected, with UNADDRESSED as the user. The UNADDRESSED mailbox allows users with Operator, Router, or Administrator privileges to route faxes from the Unaddressed mailbox to any other mailbox. If you assign the line to a user other than UNADDRESSED, all faxes received on this line will be delivered to the selected user.
The Multi-user setting allows routing based on CID and CSID information. It works in conjunction with the CDISRoute.cfg configuration file, which resides on the FaxPress Premier server.
See the following sections to properly format the CID and CSID configuration files for proper routing operation.
The following configuration files are located on the FaxPress Plus server. You either need to be physically located at the FaxPress Plus server or use Remote Desktop.
Configuring the CIDRoute.cfg configuration file for CID routing
[General]Enabled=1[CID]NNN=UserName
where NNN is the caller ID information as received (e.g., 4085551212) in canonical format, and UserName is the user name that the call will be routed to (e.g., CHUCK_DILLER).
Based on incoming routing filter rules, if a match is not made the call is routed to the user UNADDRESSED.
If you are configuring the configuration file manually, you must reboot the server for the changes to take effect.
Configuring the CSIDRoute.cfg configuration file for CSID routing
[General]Enabled=1[CSID]NNN=UserName
where NNN is the caller ID information as received (e.g., 4085551212), and UserName is the user name that the call will be routed to (e.g., CHUCK_DILLER).
Based on incoming routing filter rules, if a match is not made the call is routed to the user UNADDRESSED.
If you are configuring the configuration file manually, you must reboot the server for the changes to take effect.
|
FaxPress Premier WebHelp
Last Updated: 11/1/2007
E-mail this page |
Castelle 855 Jarvis Drive, Suite 100 Morgan Hill, CA 95037 Toll-free 800.289.7555 Tel 408.852.8000 Fax 408.852.8100 |